Custom Term Sets and Company Types
ContraxSuite utilizes the Terms Dictionary of LexNLP to automatically extract thousands of relevant Terms from your contracts. ContraxSuite comes pre-loaded with these default Term Sets, which include terms related to Generally Accepted Accounting Principles (GAAP), the Financial Accounting Standards Board (FASB), and Black’s Law Dictionary, to name just a few.
ContraxSuite also has a standard set of Company Types that can be detected by LexNLP (e.g., LLC, Ltd., Co., Corp., etc.). Additional Company Types can be added to the system. See “Company Types” below.
Some ContraxSuite admins may want more freedom with the platform. To that end, ContraxSuite allows admins to upload custom Term Sets. Have a LIBOR- or GDPR-related project that requires more precise extraction of related Terms? Do you have some contracts that are written in another language? You can customize your instance of ContraxSuite to be able to extract all the Terms you need, by creating and uploading custom Term Sets.
Note: Users with “Reviewer” System-Level permission cannot upload Term Sets.
Creating and Uploading Custom Term Sets
Default legal terms are already extracted when documents are uploaded, and these terms are used by LexNLP extractors to find and annotate default Data Entities. ContraxSuite allows admins and power users to upload their own Term Sets, which can be selected as part of the document upload process so that the system extracts those custom terms in addition to, or instead of, terms in the default Term Set. (Note: This affects clustering by Terms, and may also have an effect on machine learning down the line.)
Below are instructions for creating and uploading a custom Term Set.
1. Create a .csv file and save it to your hard drive. This .csv file should contain all of your desired custom terms. Format the .csv file using the following template:

The four columns of your CSV must be named in the following way, and filled with the following information:
Term: The individual Term itself
Source: The source of the term (e.g., “US GAAP”), and/or the Term Category determined by users.
Locale: Use “en-US” for standard American English terms. Click here for more information on Language codes.
Tags: This Tag acts as the title for this Term Set, visible in the “Advanced” panel when users create projects, and in the “Customize LexNLP” tab of a project’s “Settings”.
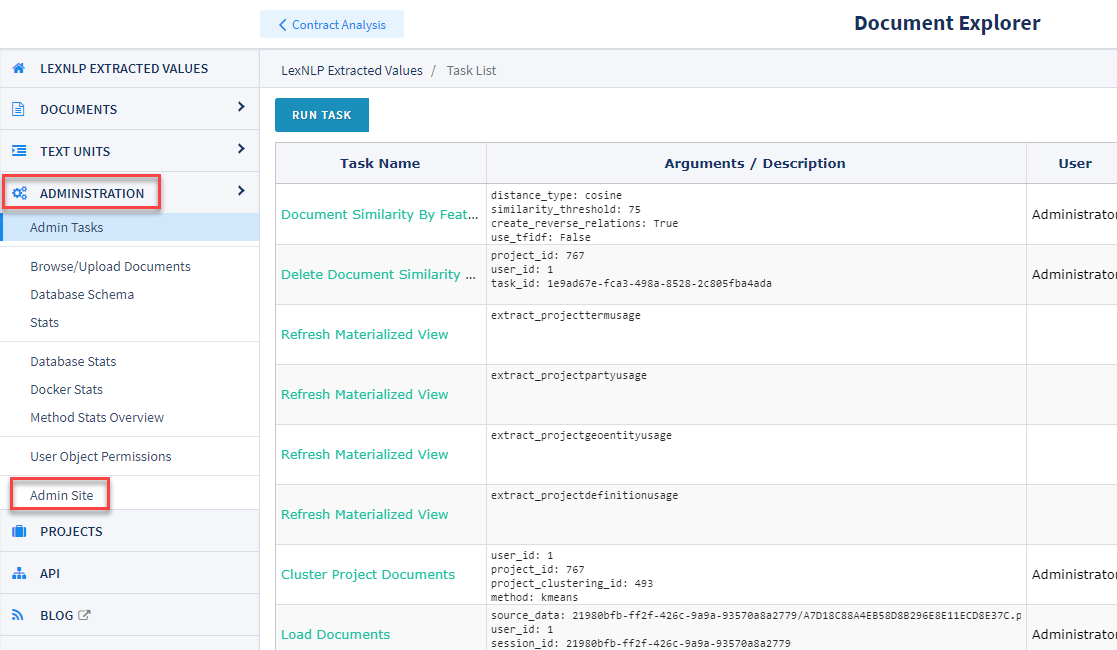
2. In the Document Explorer, go to Administration > Admin Site to open the Django Admin site. Then go to Extract > Terms.
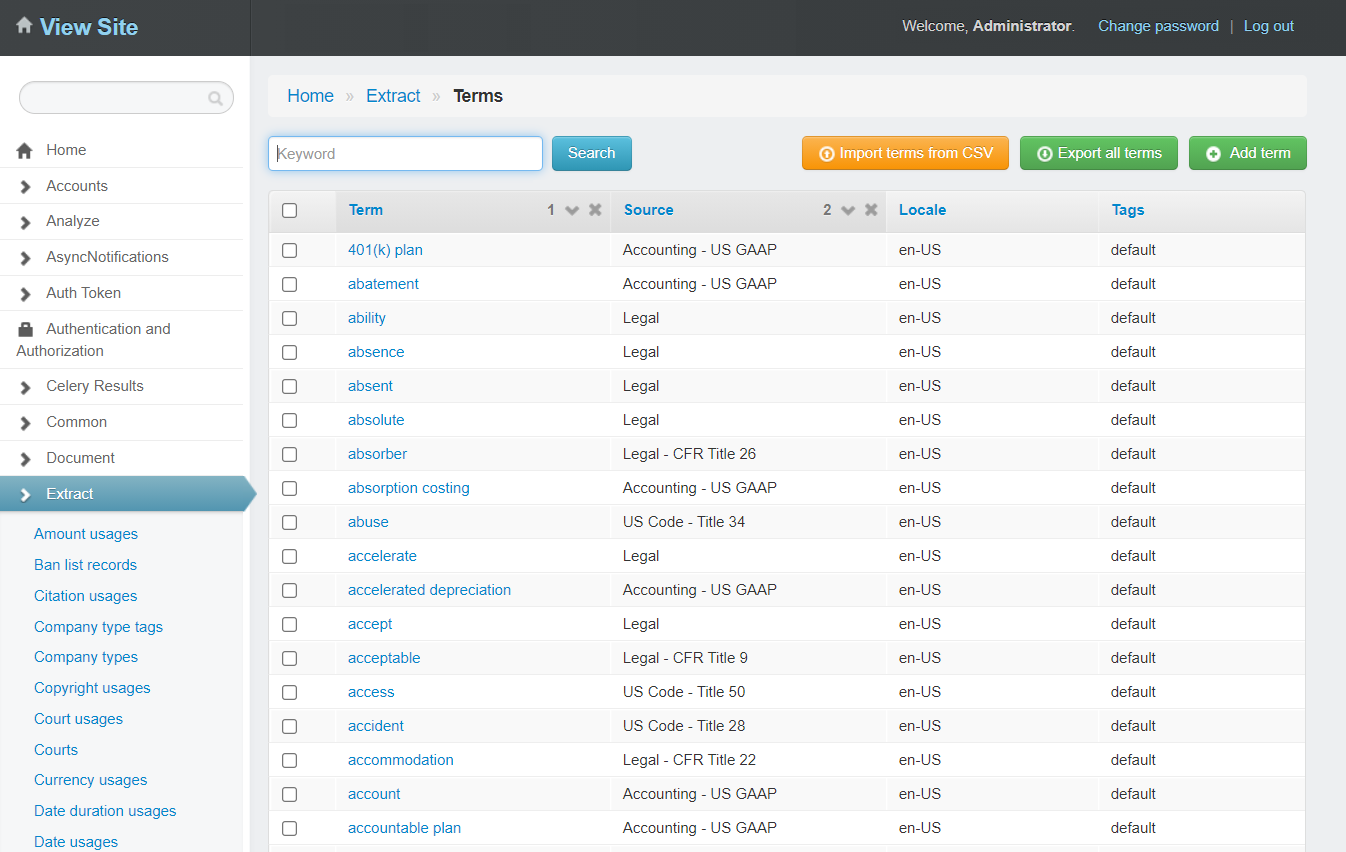
3. In the upper right, click “Import terms from CSV”.

4. A pop-up modal appears. Click “Choose File” and find the .csv file with your new Term Sets.
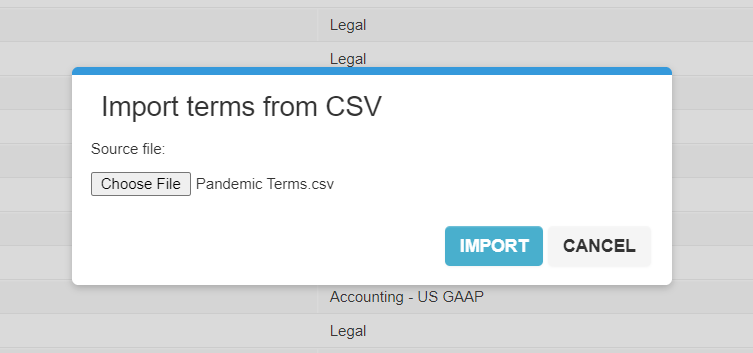
5. Click “Import”. The Import Task will begin. You can monitor the status of this upload on the Admin Tasks screen, using the refresh button in the top right to track the upload progress.
After the Upload Task for the new Term Set completes, the Term Set can be utilized either at project creation, or by going to the project’s “Settings” page and clicking the “Customize LexNLP” tab.
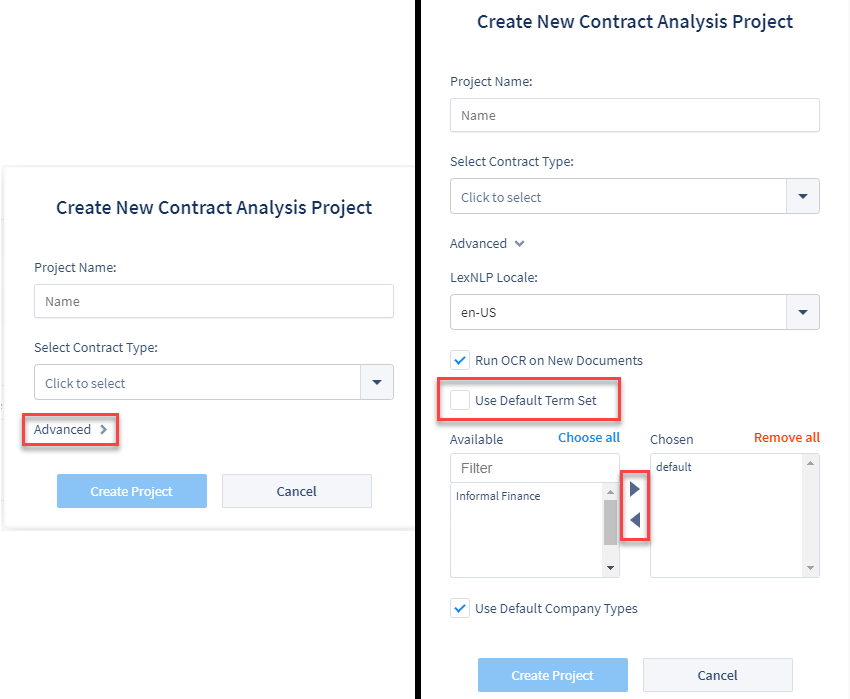
6. When creating a new project, Term Sets can be adjusted in the Advanced panel on the project creation pop-up. Uncheck the “Use Default Term Set” checkbox to see a full list of available Term Sets.
7. To change Term Sets in a pre-existing project, go to the project’s “Settings” page and click on the “Customize LexNLP” tab. On this tab you can uncheck the “Use Default Term Set” checkbox to change or add Term Sets to the project.
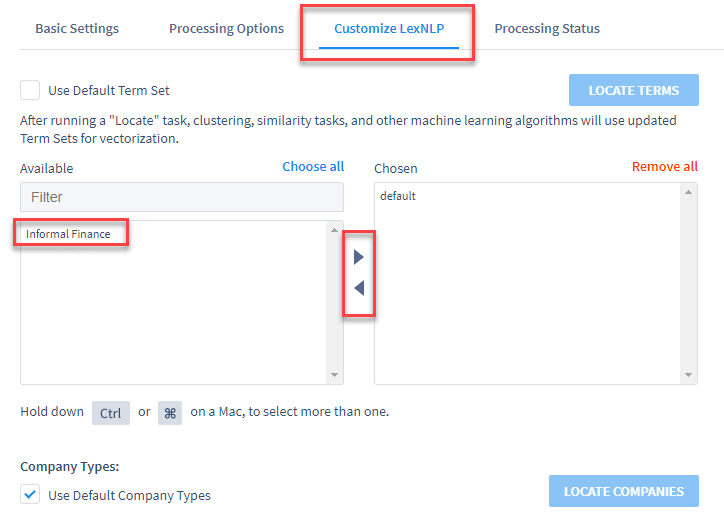
8. After adding or changing the Term Sets to use in this project, click the blue “Locate Terms” button on the right to run the new Term Set configuration on documents already in the project.
WARNING: If you don’t click “Locate Terms”, then the new Term Set configuration will only be run on documents uploaded to the project after saving these changes.
Adding and Editing Terms in a Term Set
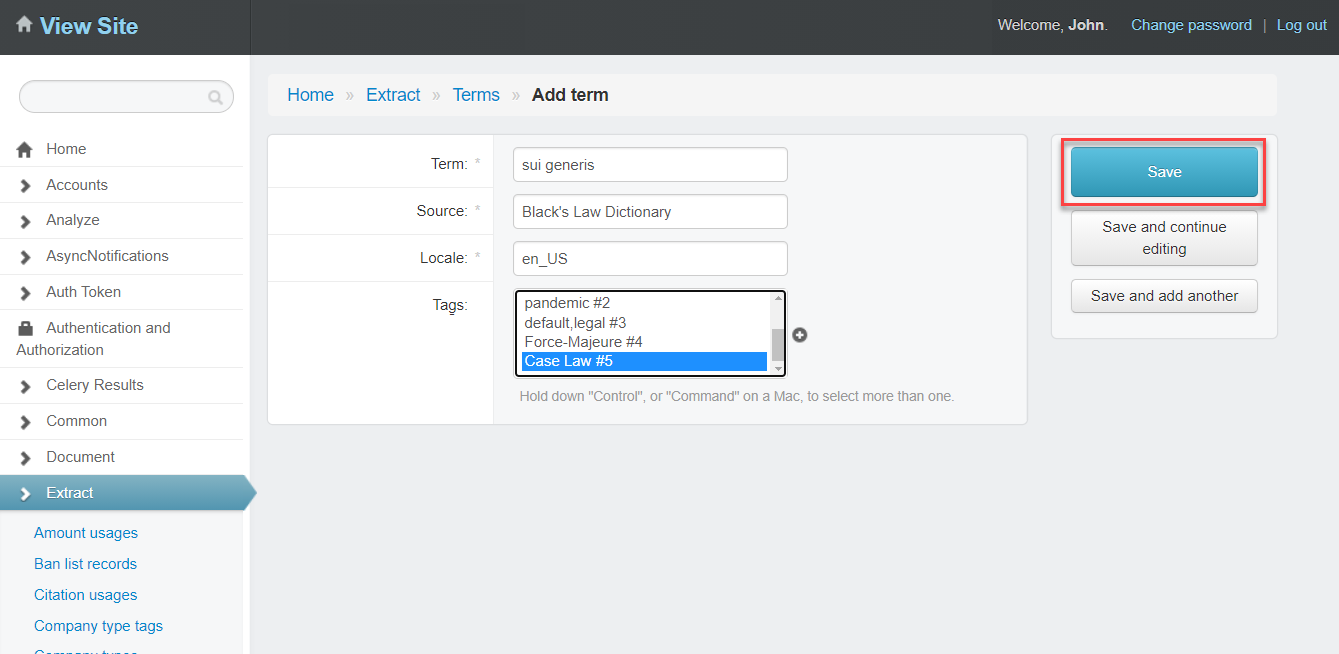
1. On the Terms Grid, click “Add term” in the upper right.
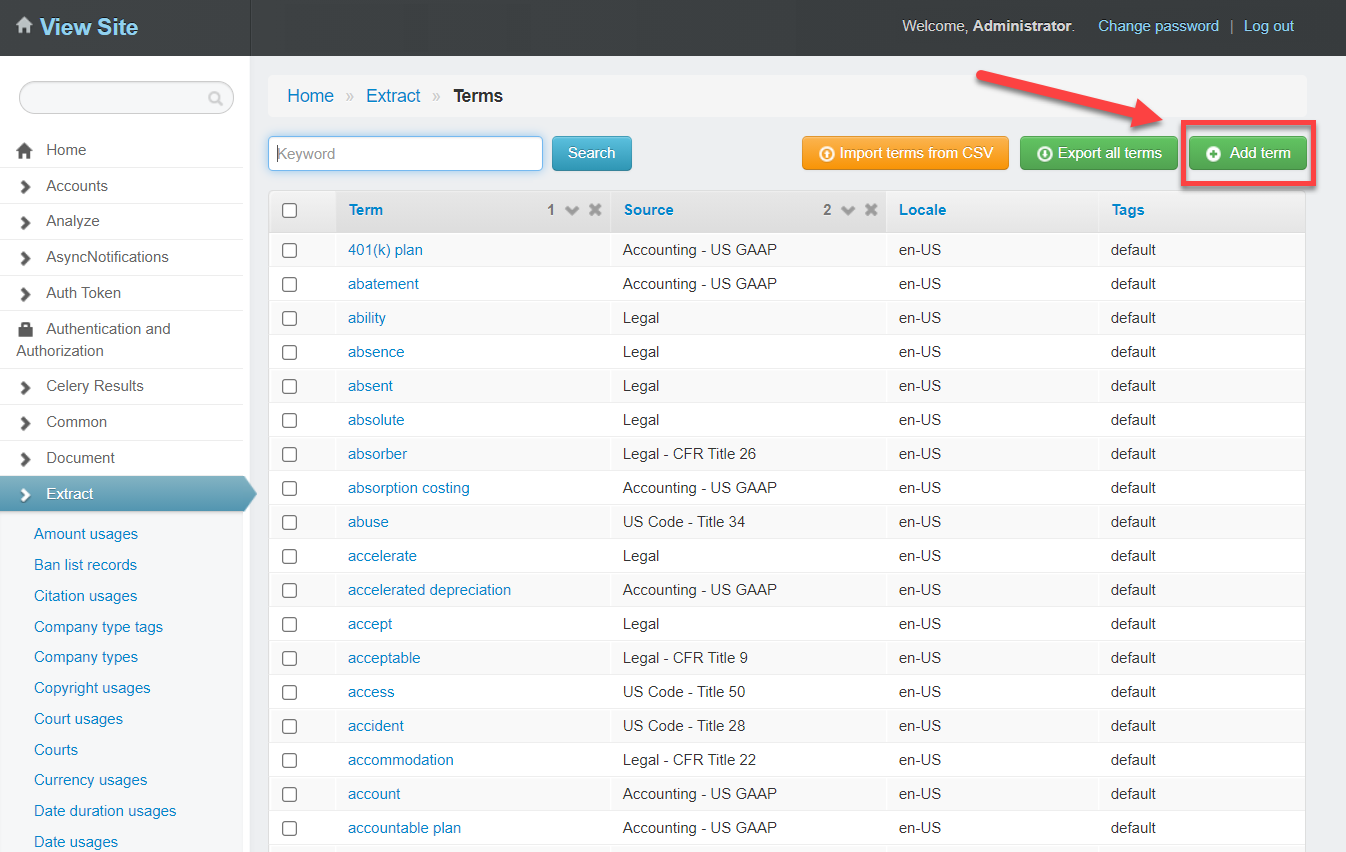
2. You are redirected to the “Add term” screen.
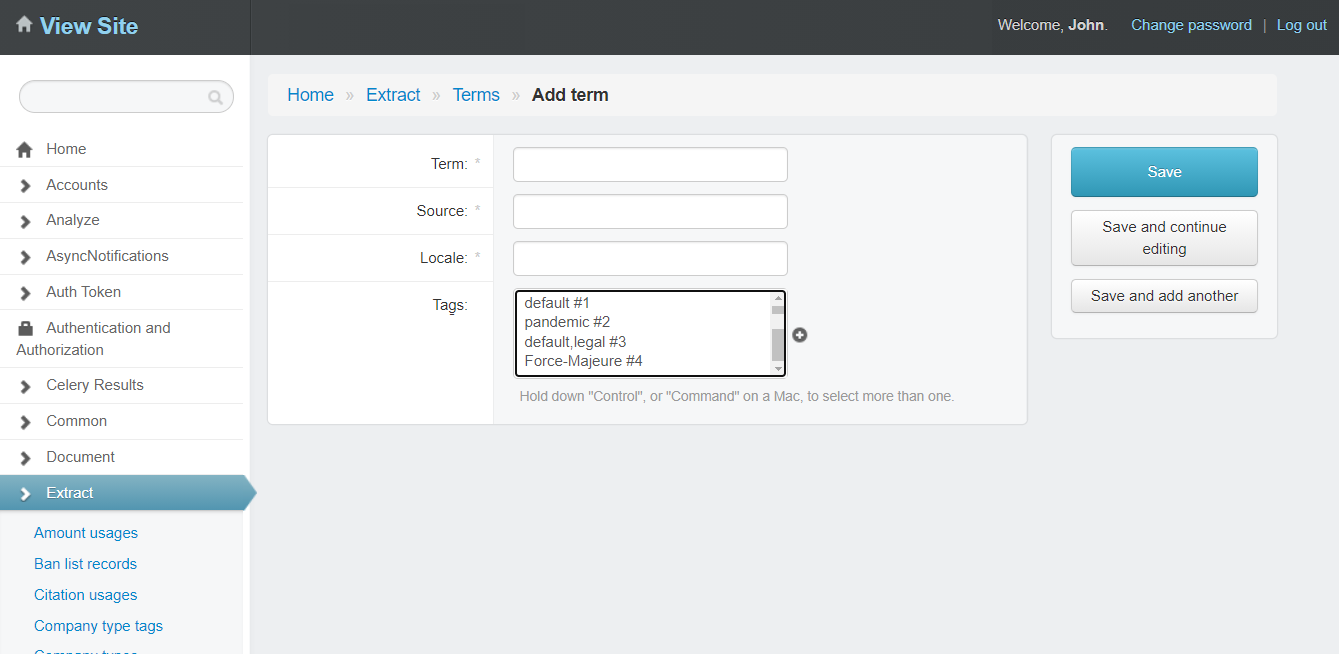
3. On the “Add term” screen, enter data for the new term you would like to add. The forms on this screen correspond to the 4 forms previously introduced above:
Term: The individual Term that you wish to add.
Source: The source of the term (e.g., “US GAAP”), and/or the Term Category determined by users.
Locale: Use “en-US” for standard American English terms. Click here for more information on Language codes.
Tags: This Tag acts as the title for this Term Set, visible in the “Advanced” panel when users create projects, and in the “Customize LexNLP” tab of a project’s “Settings”. The list of Tags on this page will be those that are already in the system. Click the “+” button to add a brand-new Tag.
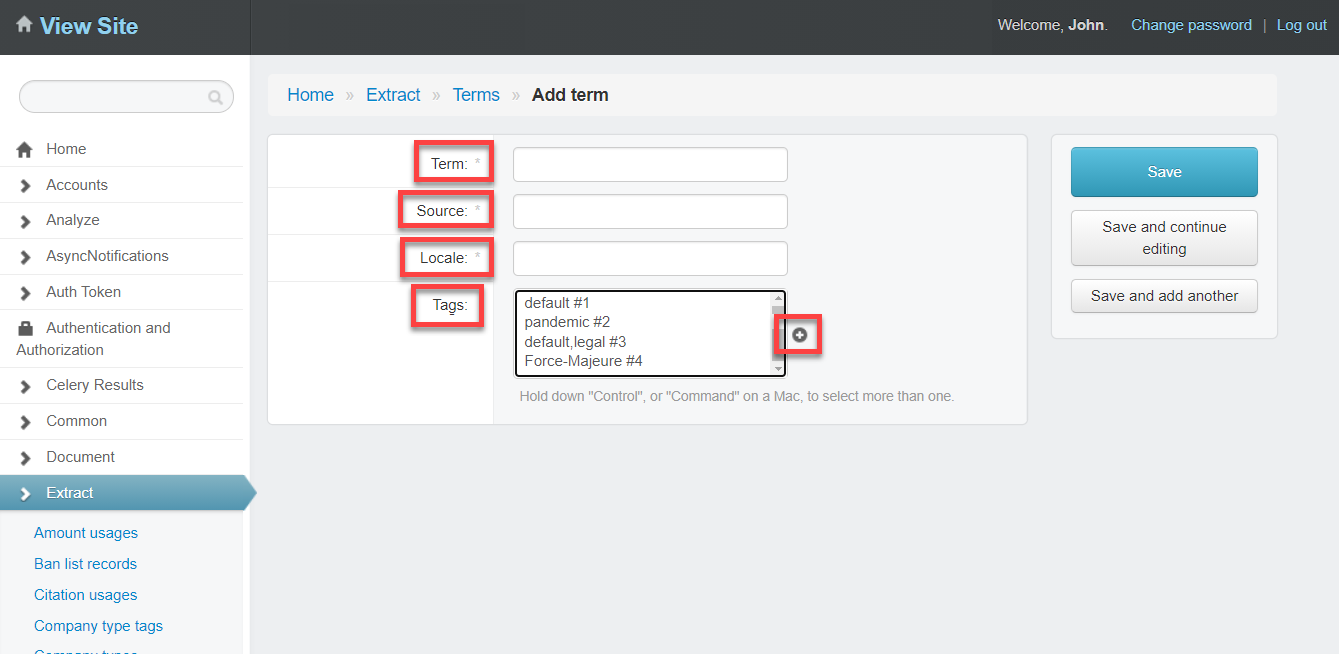
4. Clicking the “+” button will open a new window.
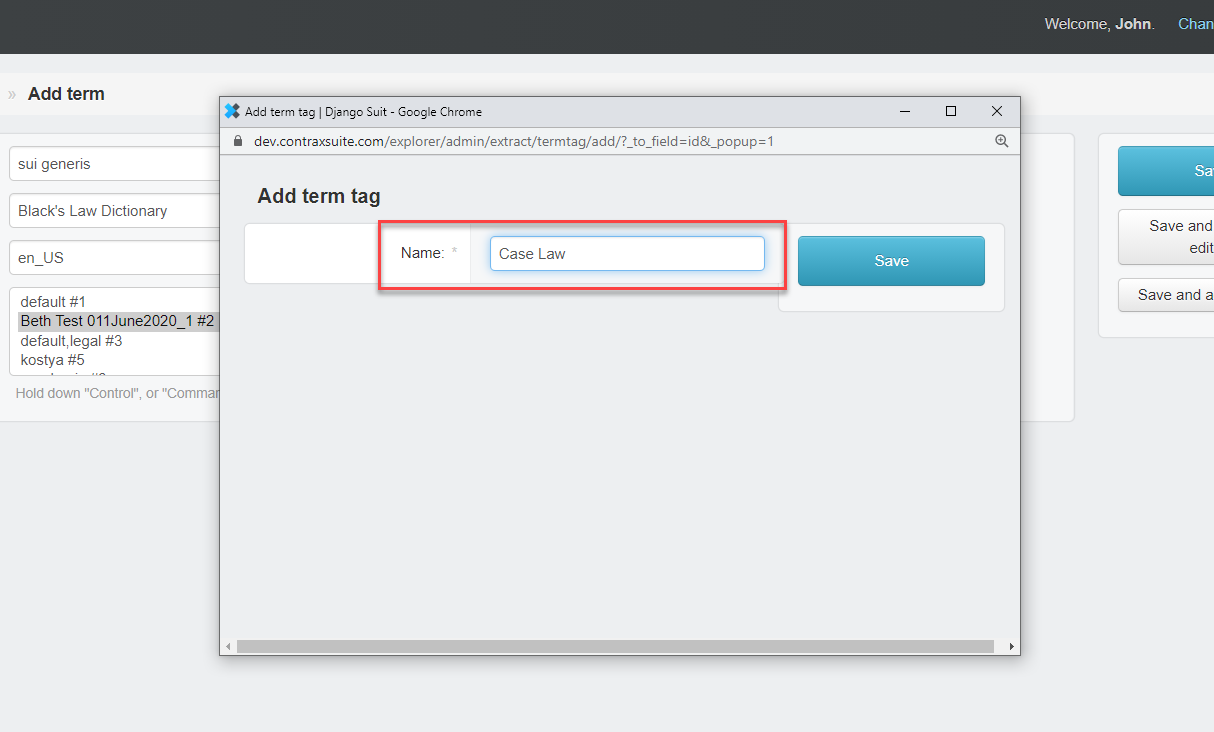
Enter a Tag you want to create for the new Term, and click “Save”.
5. Click “Save” on the right to save the new Term.
To edit a term, simply click on it in the list on the Extract > Terms grid, edit the information in the forms, and click “Save”.
Creating, Uploading, and Using Custom Company Type Sets
Standard company types are always extracted at document upload, but there may be situations where company types are either uncommon, or from a jurisdiction that LexNLP does not have standard company types for.
ContraxSuite allows admins and power users to upload their own Company Type Sets, which can then be selected as part of the document upload process so that the system extracts any company Data Entities that use those types (for example, “GmbH” for a German company).
Below are instructions for creating and uploading a custom Company Type Set.
1. Create a .csv file and save it to your hard drive. This .csv file should contain all of your desired custom company types. Format the .csv file using the following columns:

Name four columns of your CSV in the following way, and fill them with the following information:
Alias: The whole-word spelling of this Company Type to be extracted by ContraxSuite
Abbreviation: The abbreviation of this Company Type to be extracted by ContraxSuite. Note: If there is more than one abbreviation for this particular company type (e.g., LLC, L.L.C.), each abbreviation requires a separate line in the
.csvfile.Label: The way this Company Type will be displayed in the UI
Tags: The name given to this set of Company Types. This tag will be what is visible on the Project Creation pop-up, in a project’s “Settings” menu, and in the Admin Site
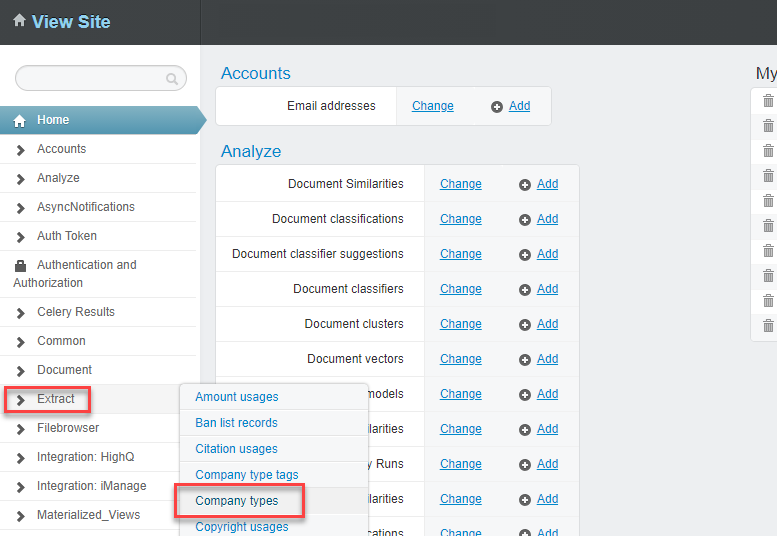
2. From the Document Explorer, navigate to Administration > Admin Site.
3. In the Django Admin Site, navigate to Extract > Company types.
4. On the “Company types” grid, click “+ Import company types from CSV”.
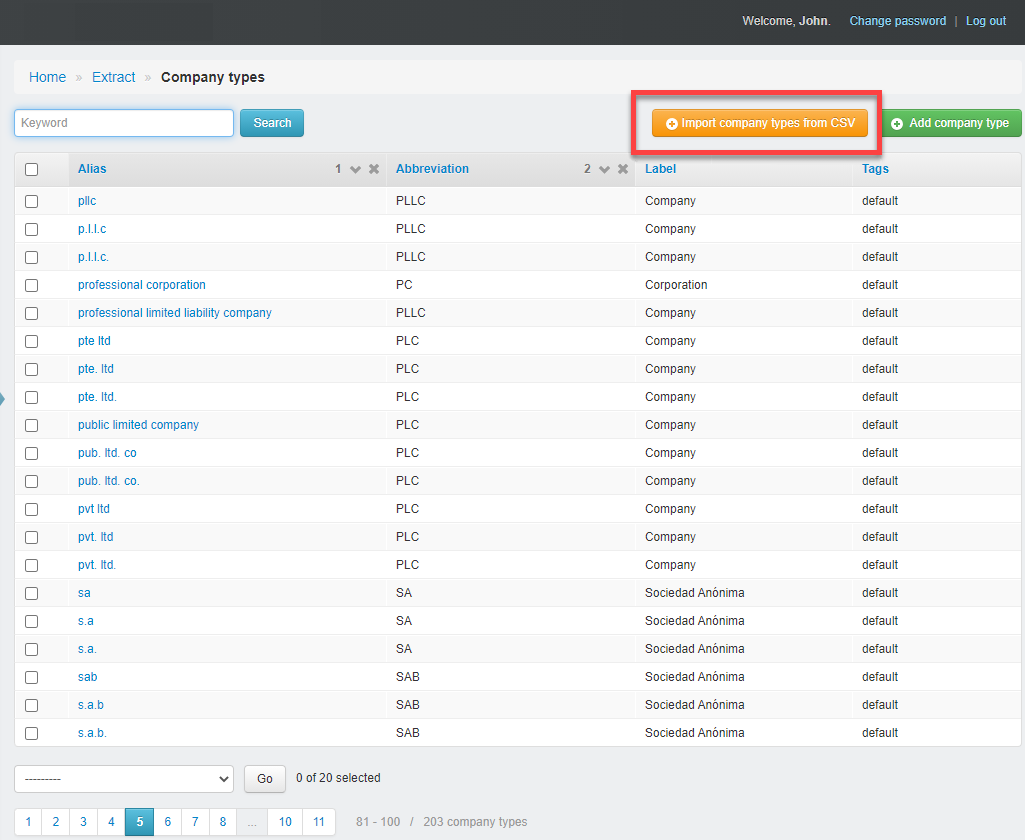
5. A pop-up window appears, for importing the Custom Company Types .csv file.
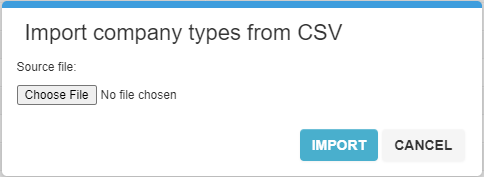
6. Click “Choose File” and find the saved .csv file on your computer. Click the “Import” button. A “Done” pop-up should appear. Click “OK” to continue. You should now see your uploaded terms listed in the Company Types grid.
7. In the Main Menu, under the Contract Analysis Project submenu, click “Add New”. In the “Create New Contract Analysis Project” modal window, Click “Advanced” to open the Advanced panel. Uncheck the “Use Default Company Types” checkbox, and a two-column selection form will open.
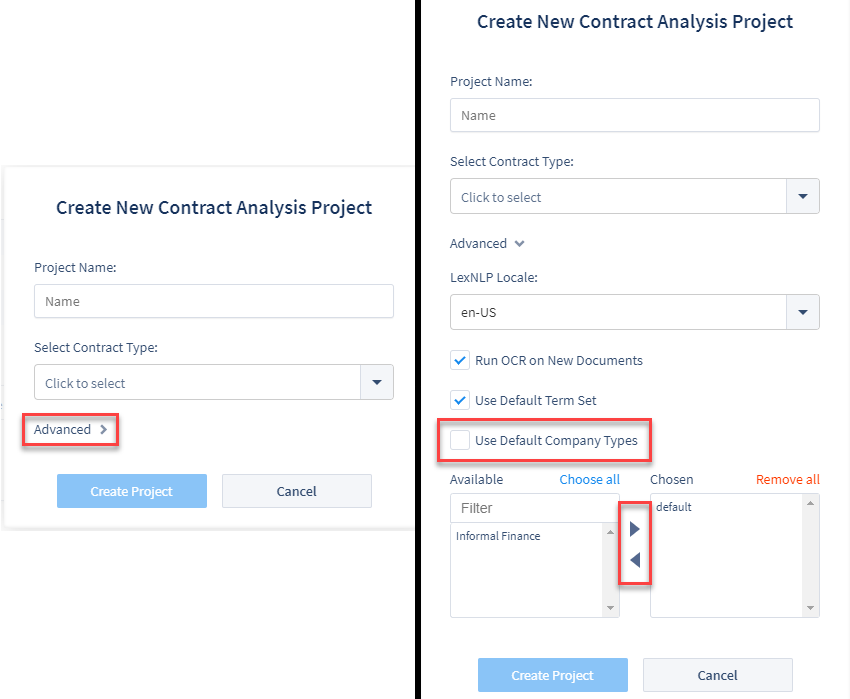
8. Select the custom Company Types set you want from the “Available” side, and use the arrow to move it to the “Chosen” side of the form. Finish filling out the other forms for your new project, and click “Create Project”.
Using Custom Companies In Pre-Existing Projects
There may be scenarios where you have already created a project, and wish to update Company Types for that project. Follow the steps above to upload a custom Company Type list to your ContraxSuite server.
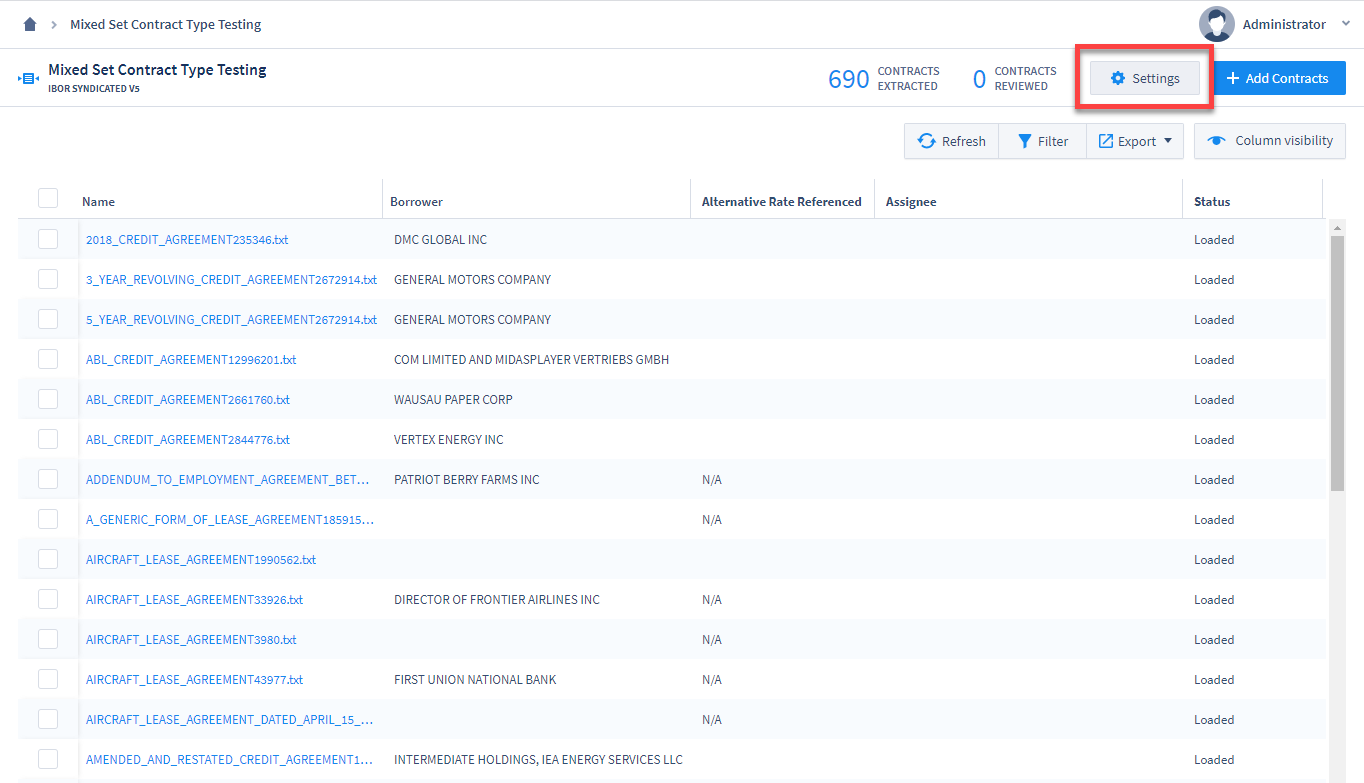
1. Open the project you wish to use these additional Company Types for, and click the “Settings” button in the top right.
2. On the “Settings” page, click the “Customize LexNLP” tab. Uncheck the “Use Default Company Types” checkbox, and a two-column selection form will open.
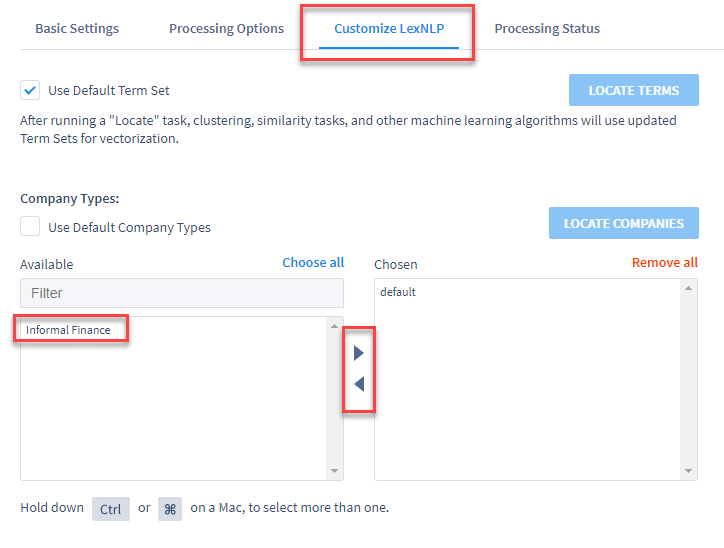
After adding or changing the Company Types to use in this project, click the blue “Locate Companies” button on the right to run the new Company Types configuration on documents already in the project. If you don’t click “Locate Companies”, then the new Company Type Set configuration will only be run on documents uploaded to the project after saving these changes.